The Static Site Guide • Chapter 3
Building a Basic Static Website
You’ve created a web page and published it online—a major milestone! Now it’s time to do more. Let’s make a basic static website with multiple pages. You’ll learn more HTML by adding headings, links, images, lists, comments, pages, and a custom 404 error page.
Laying the Foundation
Our first web page contained a short “Hello, world” message that was useful as a test but too simple to be practical.
This time, we’ll build a hypothetical website for my family that could serve a real-world purpose. It’ll be designed for extended family members and contain information about how the kids are doing. In the future, I could extend this family website to share vacation photos, heritage recipes, and a family tree of ancestors. We’ll start small for now and keep the website limited to information about immediate family members.
Feel free to modify the example content for your family as you work through these examples. If this sort of thing interests you, I encourage you to continue working on your family website after you finish this chapter. Believe it or not, family websites were prevalent before the advent of social media!
Previewing the Directory Structure
Take a look at the directory structure of our completed website. These are the files and directories we’ll have at the end of the chapter.
my-family
├── 404.html
├── contact.html
├── index.html
├── assets
|   └── images
|       ├── balloons.jpg
|       ├── family-portrait.jpg
|       └── matt.png
└── family-members
    └── matt.html
It might seem strange to think about our website’s directory structure at this stage. We haven’t written any HTML yet! And yet in a real-world scenario, this is one of the first things you’ll do when creating a website. As you add images and web pages, you’ll be glad you decided where everything goes.
Of course, you don’t need to have everything mapped out before you start. You can always make changes to your directory structure! But thinking about where things will live before building your website can help.
Creating the Directory and index.html file
Let’s get started. Create a folder called my-family on your computer. As in Chapter 1, you can put the folder on your Desktop or inside another folder. Remember, the precise location doesn’t matter—just don’t forget where you put it.
Open the folder in VS Code by selecting Open Folder from the File menu. Select the folder you just created. The folder will appear in the sidebar.
Now create a new file for the homepage by selecting New Text File from the File menu in VS Code. We’ll start with the HTML shown below. Copy and paste it into the file.
<html>
    <head>
        <title>The Cone Family Website</title>
    </head>
    <body>
        <h1>The Cone Family Website</h1>
        <p>Welcome to the virtual home of the Cone family!</p>
        <p>This is where we'll share family news and updates.</p>
    </body>
</html>
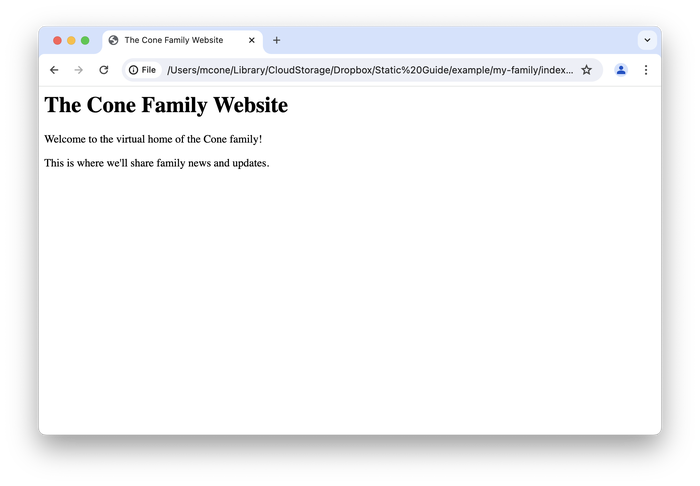
Save the file by selecting Save As from the File menu. Name the file index.html and save it in the my-family folder.
Now our directory structure looks like this:
my-family
└── index.html
Viewing the Website in a Web Browser
Let’s preview our website in a web browser. Open Chrome or Safari, and then select Open File from the File menu. Browse to the my-family directory on your computer, and then open the index.html file. You’ll see your website in your web browser, as shown below.
Adding a Heading
Our website already has a heading, but as we continue building it out, we may want to add other headings to help separate content. We can add up to six different levels of headings, like this:
<h1>Main title</h1>
<h2>Top-level heading</h2>
<h3>Subheading</h3>
<h4>Sub-subheading</h4>
<h5>Smaller sub-subheading</h5>
<h6>An even smaller sub-subheading</h6>
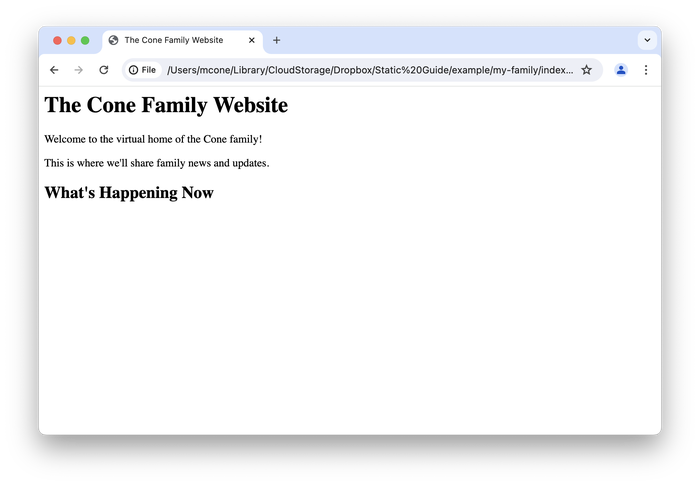
For now, let’s add an h2 heading to the index.html file:
<html>
    <head>
        <title>The Cone Family Website</title>
    </head>
    <body>
        <h1>The Cone Family Website</h1>
        <p>Welcome to the virtual home of the Cone family!</p>
        <p>This is where we'll share family news and updates.</p>

        <h2>What's Happening Now</h2>
    </body>
</html>
You might wonder what happens to the blank line before the h2 heading. The answer is: nothing. Whitespace is ignored in HTML, so blank lines or extra spaces in your code won’t be visible when you view your website in a web browser. Feel free to format your HTML in a way that’s easy to read and makes sense to you.
Copy and paste the code into the index.html file, save it, and then reload the page in your web browser. You’ll see the new heading, as shown below.
Linking to Another Website
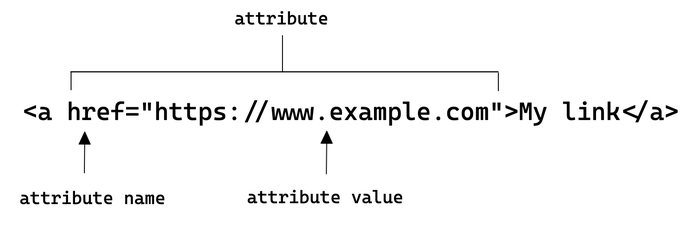
Seeing as how the internet is an interconnected series of links, the obvious next step is linking to another website. Links are easy to add. Just visit the website or web page you want to link to and copy and paste the URL into this tag: <a href="https://www.example.com">my link name</a>.
Let’s add a link to the index.html file:
<html>
<head>
<title>The Cone Family Website</title>
</head>
<body>
<h1>The Cone Family Website</h1>
<p>Welcome to the virtual home of the Cone family!</p>
<p>This is where we'll share family news and updates.</p>
<h2>What's Happening Now</h2>
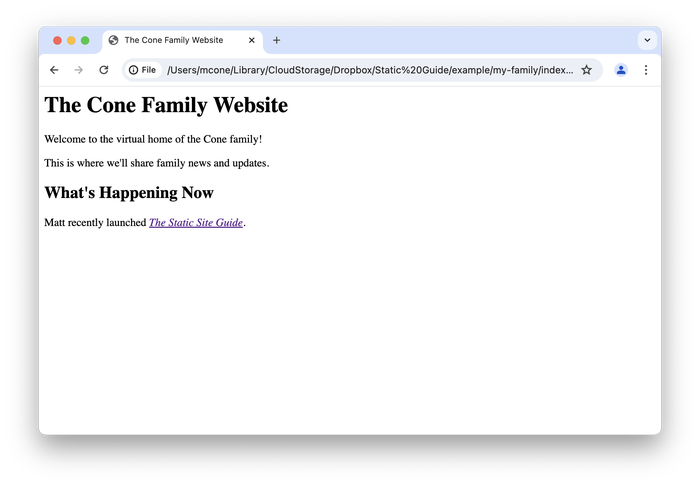
<p>Matt recently launched <a href="https://www.staticguide.org"><em>The Static Site Guide</em></a>.</p>
</body>
</html>
The a tag has something we haven’t seen before: an attribute. An attribute contains information about an HTML element that won’t appear on the web page. In this case, href is the attribute name, and https://www.staticguide.org is the attribute value. When you click the link, the web browser takes you to the URL specified in the attribute value.
In addition to the link, we’ve added em tags to italicize the book’s title. Pay attention to how I’ve structured the tags. You should always nest HTML tags by closing the tags in the order you opened them. In this case, because we opened the em tag after the a tag, we closed the em tag before the a tag.
Copy and paste the code into the index.html file, save it, and then reload the page in your web browser. You’ll see the link, as shown below.
Adding an Image
No website would be complete without images. You’ve probably heard the expression “a picture is worth a thousand words.” That holds doubly true when it comes to images on websites. Images in articles, blog posts, and homepages can convey information and make websites more attractive. So let’s add an image!
Images are files, so they’ll need to be added to our website’s directory structure. Let’s create a new directory for our images now. We’re going to do a bit of future-proofing and create two directories at this point: A directory named assets, and another directory inside named images. The assets directory will eventually hold multiple directories.
Our directory structure looks like this:
my-family
├── index.html
└── assets
    └── images
Now we can add an image. Fortunately, I have two creative children who create royalty-free artwork for me. I’ll add one of their images to the images directory. Now our directory structure looks like this:
my-family
├──index.html
└── assets
    └── images
        └── family-portrait.jpg
You can download the image I’m using, or use one of your own.
We can add the image to our website by using the img HTML tag as follows:
<html>
<head>
<title>The Cone Family Website</title>
</head>
<body>
<h1>The Cone Family Website</h1>
<p>Welcome to the virtual home of the Cone family!</p>
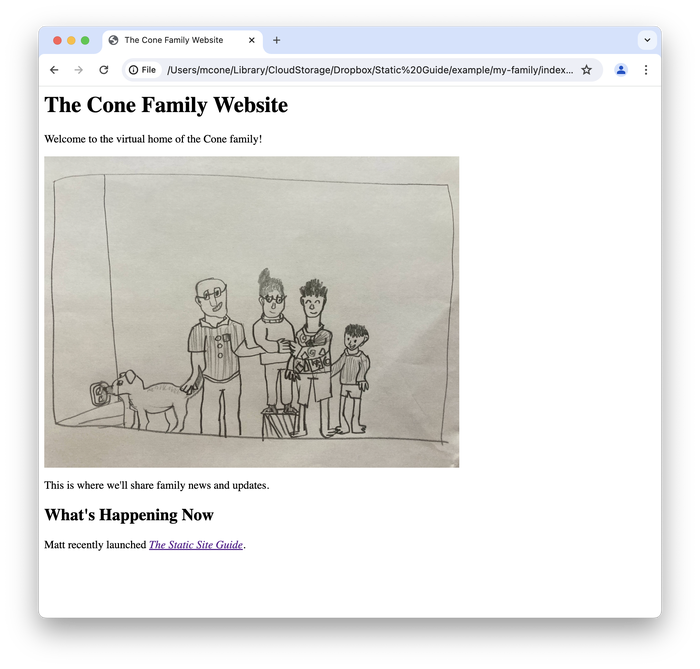
<img src="assets/images/family-portrait.jpg" width="600" alt="Finn's drawing of our family">
<p>This is where we'll share family news and updates.</p>
<h2>What's Happening Now</h2>
<p>Matt recently launched <a href="https://www.staticguide.org"><em>The Static Site Guide</em></a>.</p>
</body>
</html>
The img tag has several attributes. The src attribute contains a relative path to the image file to tell the web browser where it’s located in our directory structure relative to the current page. Since our image isn’t in the same directory as the index.html file, we need to specify the directories (assets/images/) in the path.
The width attribute sets the width of our image in pixels. This particular image has large dimensions, so the width attribute will help fit it onto the page. And the alt attribute contains a written description of our image. Search engines use this to categorize our image, and screen readers use this to make the image accessible.
Copy and paste the code into the index.html file, save it, and then reload the page in your web browser. You’ll see the image, as shown below.
Leaving Yourself Comments
If you’ve ever written on a sticky note to remind yourself about something, you’ll appreciate the value of comments in code. You can create comments in your HTML code that are visible in VS Code but hidden from view when the website is viewed in a web browser.
Let’s add a comment to the index.html file between <!-- and -->:
<html>
    <head>
        <title>The Cone Family Website</title>
    </head>
    <body>
        <h1>The Cone Family Website</h1>
        <p>Welcome to the virtual home of the Cone family!</p>
        <!-- Don't forget to update this image with our holiday photo in December -->
        <img src="assets/images/family-portrait.jpg" width="600" alt="Finn's drawing of our family">
        <p>This is where we'll share family news and updates.</p>

        <h2>What's Happening Now</h2>
        <p>Matt recently launched <a href="https://www.staticguide.org"><em>The Static Site Guide</em></a>.</p>
    </body>
</html>
Copy and paste the code into the index.html file, save it, and then reload the page in your web browser. See how the comment doesn’t appear anywhere on the page? It’s only visible in the source code!
Feel free to make use of comments as you work on your website. They’re useful for reminding yourself about what certain HTML elements do and why you used them. You can also leave yourself notes about changes you plan to make in the future.
Creating an Unordered List
Next, we’ll create an unordered list for family members. The list will contain bullets for each individual with a short description. We can add the unordered list to our website by nesting li tags inside the ul HTML tags as follows:
<html>
<head>
<title>The Cone Family Website</title>
</head>
<body>
<h1>The Cone Family Website</h1>
<p>Welcome to the virtual home of the Cone family!</p>
<!-- Don't forget to update this image with our holiday photo in December -->
<img src="assets/images/family-portrait.jpg" width="600" alt="Finn's drawing of our family">
<p>This is where we'll share family news and updates.</p>
<h2>What's Happening Now</h2>
<p>Matt recently launched <a href="https://www.staticguide.org"><em>The Static Site Guide</em></a>.</p>
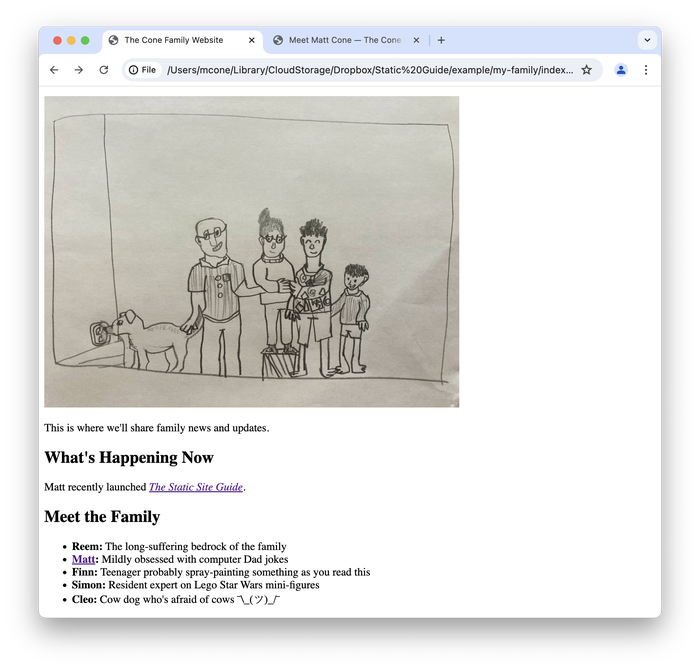
<h2>Meet the Family</h2>
<ul>
<li><strong>Reem:</strong> The long-suffering bedrock of the family</li>
<li><strong>Matt:</strong> Mildly obsessed with computer Dad jokes</li>
<li><strong>Finn:</strong> Teenager probably spray-painting something as you read this</li>
<li><strong>Simon:</strong> Resident expert on Lego Star Wars mini-figures</li>
<li><strong>Cleo:</strong> Cow dog who's afraid of cows ¯\_(ツ)_/¯</li>
</ul>
</body>
</html>
Lists require two type of tags: One tag for the list and another for each list item. The <ul> and </ul> tags mark the beginning and end of the unordered list. The <li> and </li> tags denote an individual list item.
Copy and paste the code into the index.html file, save it, and then reload the page in your web browser. You’ll see the list, as shown below.

Adding Boilerplate Elements and Attributes
Every web page needs certain boilerplate HTML elements and attributes. For the sake of simplicity, we omitted these initially. Now that you’re gaining competency and learning more HTML, we’ll add these to the index.html file before creating other web pages. In the future, every new web page we create will contain these boilerplate elements and attributes.
Update the index.html file as follows:
<!DOCTYPE html>
<html lang="en">
    <head>
        <meta charset="utf-8">
        <meta name="viewport" content="width=device-width">
        <title>The Cone Family Website</title>
    </head>
    <body>
        <h1>The Cone Family Website</h1>
        <p>Welcome to the virtual home of the Cone family!</p>
        <!-- Don't forget to update this image with our holiday photo in December -->
        <img src="assets/images/family-portrait.jpg" width="600" alt="Finn's drawing of our family">
        <p>This is where we'll share family news and updates.</p>

        <h2>What's Happening Now</h2>
        <p>Matt recently launched <a href="https://www.staticguide.org"><em>The Static Site Guide</em></a>.</p>

        <h2>Meet the Family</h2>
        <ul>
          <li><strong>Reem:</strong> The long-suffering bedrock of the family</li>
          <li><strong>Matt:</strong> Mildly obsessed with computer Dad jokes</li>
          <li><strong>Finn:</strong> Teenager probably spray-painting something as you read this</li>
          <li><strong>Simon:</strong> Resident expert on Lego Star Wars mini-figures</li>
          <li><strong>Cleo:</strong> Cow dog who's afraid of cows ¯\_(ツ)_/¯</li>
        </ul>
    </body>
</html>
Here are descriptions of the elements and attributes we added:
| Element | Description |
|---|---|
<!DOCTYPE html> | Tells web browsers that the web page is an HTML document. Needs to be the first line of the file. |
<html lang="en"> | Tells web browsers what language the web page is written in. |
<meta charset="utf-8"> | Declares that your web page uses the UTF-8 character set. Once set, you can include essentially any textual elements in your web page, like emoji or the trademark symbol. |
<meta name="viewport" content="width=device-width"> | Makes your web page look better on phones and mobile devices. You can learn more about viewports on MDN’s website. |
Copy and paste the code into the index.html file, save it, and then reload the page in your web browser. Everything should look identical since these elements and attributes merely pass meta information to the web browser.
Creating a New Web Page
So far, our website only has a single web page. That’s been useful as far as it goes—it’s easy to update and manage—but it’s also not very realistic. Most websites have many different web pages.
In this section, we’ll add a new web page to our website. This one will feature a family member and include personal information about the individual that extended family members might find interesting.
The first step is adding the new web page and image. Let’s look at where these files will live in our directory structure.
my-family
├── index.html
├── assets
|   └── images
|       ├── family-portrait.jpg
|       └── matt.png
└── family-members
    └── matt.html
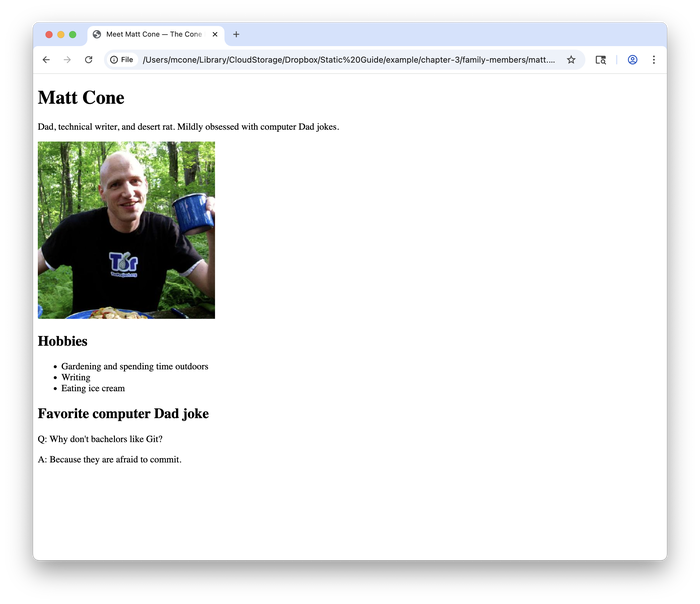
Create the new directory called family-members, and then create the matt.html file inside that directory using your text editor. You can copy and paste the following code into the file:
<!DOCTYPE html>
<html lang="en">
    <head>
        <meta charset="utf-8">
        <meta name="viewport" content="width=device-width">
        <title>Meet Matt Cone — The Cone Family Website</title>
    </head>
    <body>
        <h1>Matt Cone</h1>
        <p>Dad, technical writer, and desert rat. Mildly obsessed with computer Dad jokes.</p>
        <img src="../assets/images/matt.jpg" width="300" alt="Photo of Matt Cone">

        <h2>Hobbies</h2>
        <ul>
          <li>Gardening and spending time outdoors</li>
          <li>Writing</li>
          <li>Eating ice cream</li>
        </ul>

        <h2>Favorite computer Dad joke</h2>
        <p>Q: Why don't bachelors like Git?</p>
        <p>A: Because they are afraid to commit.</p>
    </body>
</html>
Don’t forget to add an image to your image directory if you decide to use one. You can download the image I’m using, or use one of your own.
Look at the relative path for the image file: ../assets/images/matt.jpg. What does the ../ do? Since the assets directory is one level higher than the matt.html file, the ../ tells the web browser to access the assets directory in the my-family directory.
Save the changes to the matt.html file if you haven’t already done so, and then open the file in your web browser. You’ll see the new page, as shown below.
Linking Between the Web Pages
Now we need to link from the homepage (index.html) to the page we just created (matt.html), and vice versa.
Earlier in this chapter, we linked to another website using a fully-qualified URL. A fully-qualified URL contains the entire domain name. Use fully-qualified URLs for links to external resources, like a different website. But for links to pages on your website, use a relative path, like you do for image files.
Remember, relative paths contain the path to the web page relative to the directory structure, but they don’t contain the website’s domain. When we link to the matt.html page on our website, we’ll use <a href="family-members/matt.html"> and not <a href="https://sensational-duckanoo-efb1d0.netlify.app/family-members/matt.html">.
The advantage of relative paths is that they work wherever you happen to be hosting your website, whether that’s your personal computer or a web server.
Let’s add the link to the index.html file:
<!DOCTYPE html>
<html lang="en">
    <head>
        <meta charset="utf-8">
        <meta name="viewport" content="width=device-width">
        <title>The Cone Family Website</title>
    </head>
    <body>
        <h1>The Cone Family Website</h1>
        <p>Welcome to the virtual home of the Cone family!</p>
        <!-- Don't forget to update this image with our holiday photo in December -->
        <img src="assets/images/family-portrait.jpg" width="600" alt="Finn's drawing of our family">
        <p>This is where we'll share family news and updates.</p>

        <h2>What's Happening Now</h2>
        <p>Matt recently launched <a href="https://www.staticguide.org"><em>The Static Site Guide</em></a>.</p>

        <h2>Meet the Family</h2>
        <ul>
          <li><strong>Reem:</strong> The long-suffering bedrock of the family</li>
          <li><strong><a href="family-members/matt.html">Matt</a>:</strong> Mildly obsessed with computer Dad jokes</li>
          <li><strong>Finn:</strong> Teenager probably spray-painting something as you read this</li>
          <li><strong>Simon:</strong> Resident expert on Lego Star Wars mini-figures</li>
          <li><strong>Cleo:</strong> Cow dog who's afraid of cows ¯\_(ツ)_/¯</li>
        </ul>
    </body>
</html>
Copy and paste the code into the index.html file, save it, and then reload the page in your web browser. You should see the link, as shown below. When you click it, the matt.html web page should load in your web browser.
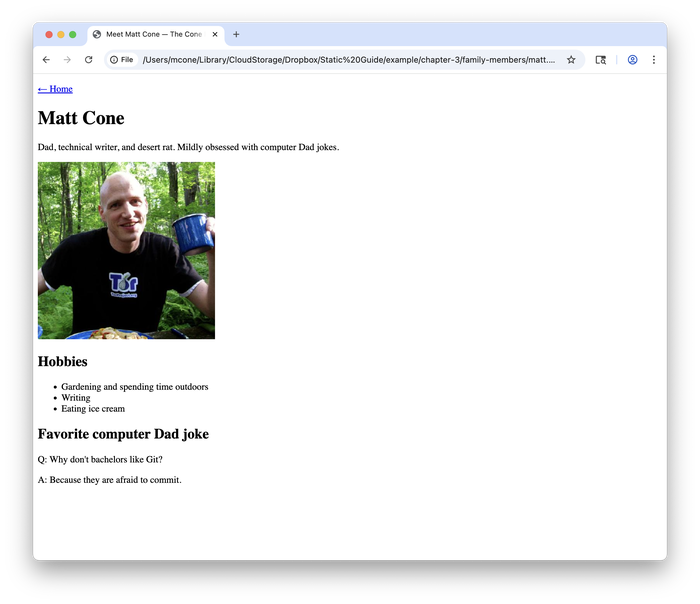
Now we can add a link to the homepage from the matt.html page:
<!DOCTYPE html>
<html lang="en">
    <head>
        <meta charset="utf-8">
        <meta name="viewport" content="width=device-width">
        <title>Meet Matt Cone — The Cone Family Website</title>
    </head>
    <body>
        <p><a href="../index.html">← Home</a></p>
        <h1>Matt Cone</h1>
        <p>Dad, technical writer, and desert rat. Mildly obsessed with computer Dad jokes.</p>
        <img src="../assets/images/matt.jpg" width="300" alt="Photo of Matt Cone">

        <h2>Hobbies</h2>
        <ul>
          <li>Gardening and spending time outdoors</li>
          <li>Writing</li>
          <li>Eating ice cream</li>
        </ul>

        <h2>Favorite computer Dad joke</h2>
        <p>Q: Why don't bachelors like Git?</p>
        <p>A: Because they are afraid to commit.</p>
    </body>
</html>
Copy and paste the code into the matt.html file, save it, and then reload the page in your web browser. You should see the link, as shown below. When you click it, the home web page should load in your web browser.
If you created web pages for the other family members, feel free to continue adding links to and from those web pages.
Creating a Custom 404 Page
Accidents happen. If someone tries to access a page that doesn’t exist on our website, the server will return a 404 Not Found to the client. The way we have things set up right now, the visitor will see a generic message indicating the requested web page doesn’t exist.
404 is a universally recognized status code that the web server sends to the client when a resource isn’t found. This is just one of many status codes that servers use to communicate with clients. You can learn more about status codes on MDN’s website.Since we’re using Netlify, we can improve this experience by creating a custom 404 page for our website.
You’ve probably noticed custom 404 pages on other websites. Some have funny messages that make you laugh. Others provide a search field to help you find what you’re looking for. Whatever you decide to do, a custom 404 page can help personalize your website. Let’s create one now.
The new 404.html file will live in the top-level of our directory structure, and the balloons.jpg image will be in assets/images.
my-family
├── 404.html
├── index.html
├── assets
|   └── images
|       ├── balloons.jpg
|       ├── family-portrait.jpg
|       └── matt.png
└── family-members
    └── matt.html
Create the 404.html file in the my-family directory. You can copy and paste the following code into the file:
<!DOCTYPE html>
<html lang="en">
<head>
<meta charset="utf-8">
<meta name="viewport" content="width=device-width">
<title>404 Not Found</title>
</head>
<body>
<h1>Oops! We can't find that!</h1>
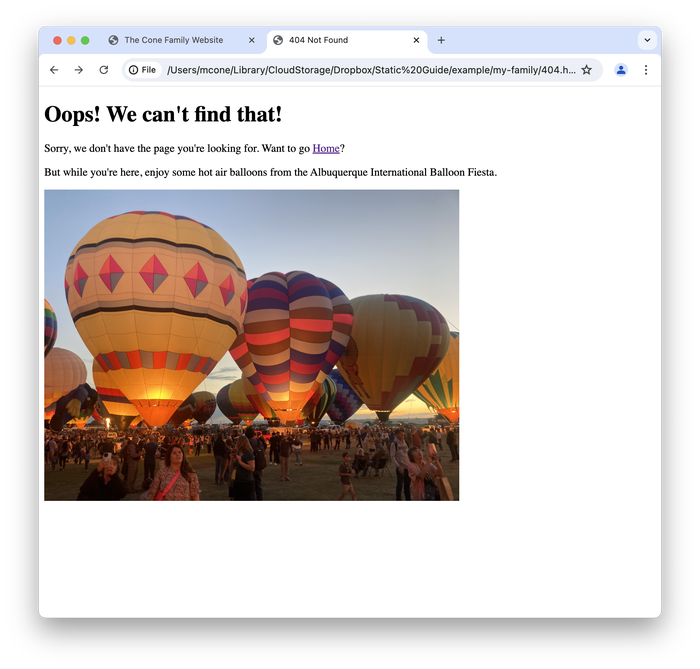
<p>Sorry, we don't have the page you're looking for. Want to go <a href="index.html">Home</a>?</p>
<p>But while you're here, enjoy some hot air balloons from the Albuquerque International Balloon Fiesta.</p>
<img src="assets/images/balloons.jpg" width="600" alt="Hot air balloons.">
</body>
</html>
Don’t forget to add an image to your image directory if you decide to use one. You can download the image I’m using, or use one of your own. Save the changes to the 404.html file if you haven’t already done so, and then open the file in your web browser. You’ll see the new page, as shown below.
https://sensational-duckanoo-efb1d0.netlify.app/asdf (using the URL for your website) in your web browser’s address bar and you should see the 404 page.Making a Contact Page
Contact pages have fallen out of favor, but they’re still a good idea, in my opinion. You never know who may want to get in touch with you! That’s why the last page we’ll create in this chapter will contain a link to our email address and, as an alternate contact option, a form with fields people can fill out to contact us.
Creating an Email Link
An email link is nearly identical to other links, but it’s different in one important respect: It contains mailto: in the attribute value before the email address. Take a look at this example:
My <a href="mailto:fake-email@example.com">email address</a>
When visitors click the email link, their web browser will open their default email application and create a new message with your address as the recipient.
There are reasons why you might not want to use an email link. The first is personal preference: Visitors might be less inclined to send email than fill out a contact form.
There are also privacy concerns. If you worry that your published email address will be harvested by spam bots and your inbox will be inundated with junk mail, use the form instead of the email link. However, in our modern email era with next-generation spam filters, I can tell you from personal experience that spam isn’t as big a deal as it used to be.
Creating a Form
Our contact form will have fields visitors can use to enter information like their name, email address, message, and favorite ice cream flavor. Forms are created in HTML, but they require a server-side component to listen for form submissions and do something with them. Since we’re using Netlify, we can use their form feature to collect and process form submissions.
Take a look at this example HTML for a form:
<form name="contact" method="POST" netlify>
    <p>
        <label>Name: <input type="text" name="name"></label>
    </p>
    <p>
        <button type="submit">Send</button>
    </p>
</form>
The form tags encapsulate all of the form elements. The label tags provide a caption for the form elements, the input tag creates a form field that visitors can type text in, and the button tag creates a button visitors can click to submit the form. After visitors submit the form, the web browser will send the form data to Netlify.
Feel free to customize the fields and labels when you build your own form!
Putting It All Together
Now it’s time to create the contact.html page using what we learned about email links and forms. The first step is adding the new web page. Let’s look at where this file will live in our directory structure.
my-family
├── 404.html
├── contact.html
├── index.html
├── assets
|   └── images
|       ├── balloons.jpg
|       ├── family-portrait.jpg
|       └── matt.png
└── family-members
    └── matt.html
Create the contact.html file inside the my-family directory using your text editor. You can copy and paste the following code into the file:
<!DOCTYPE html>
<html lang="en">
<head>
<meta charset="utf-8">
<meta name="viewport" content="width=device-width">
<title>Contact the Cone Family</title>
</head>
<body>
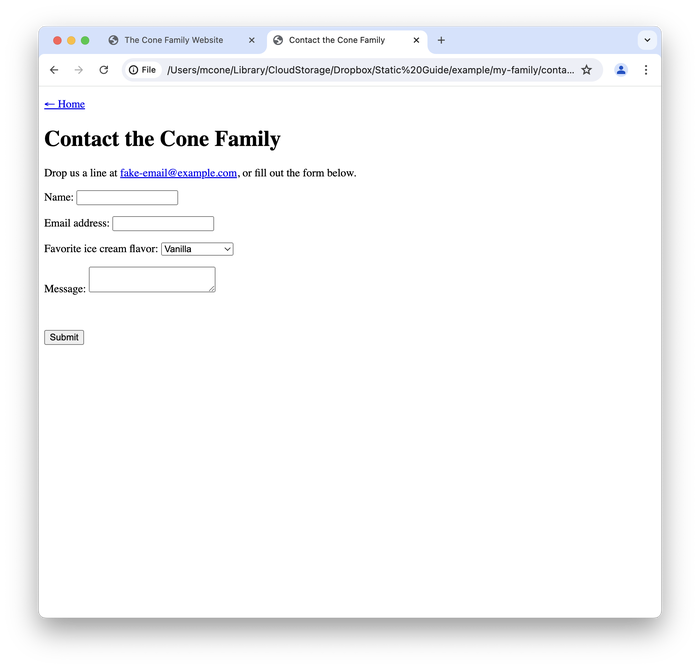
<p><a href="../index.html">← Home</a></p>
<h1>Contact the Cone Family</h1>
<p>Drop us a line at <a href="mailto:fake-email@example.com">fake-email@example.com</a>, or fill out the form below.</p>
<form name="contact" method="POST" netlify>
<p>
<label>Name: <input type="text" name="name"></label>
</p>
<p>
<label>Email address: <input type="email" name="email"></label>
</p>
<p>
<label>Favorite ice cream flavor: <select name="icecream[]">
<option value="vanilla">Vanilla</option>
<option value="chocolate">Chocolate</option>
<option value="bubblegum">Bubble gum</option>
<option value="cookiedough">Cookie dough</option>
</select></label>
</p>
<p>
<label>Message: <textarea name="message"></textarea></label>
</p>
<br>
<p>
<button type="submit">Submit</button>
</p>
</form>
</body>
</html>
There’s a new HTML tag two lines above the Submit button: br. This is a line break element. It doesn’t have a closing tag—you only use a single br tag for a line break. We’ll use it here to move the Submit button down one line.
Save the changes to the contact.html file if you haven’t already done so, and then open the file in your web browser. You’ll see the new page, as shown below.
Enabling Netlify’s Form Feature
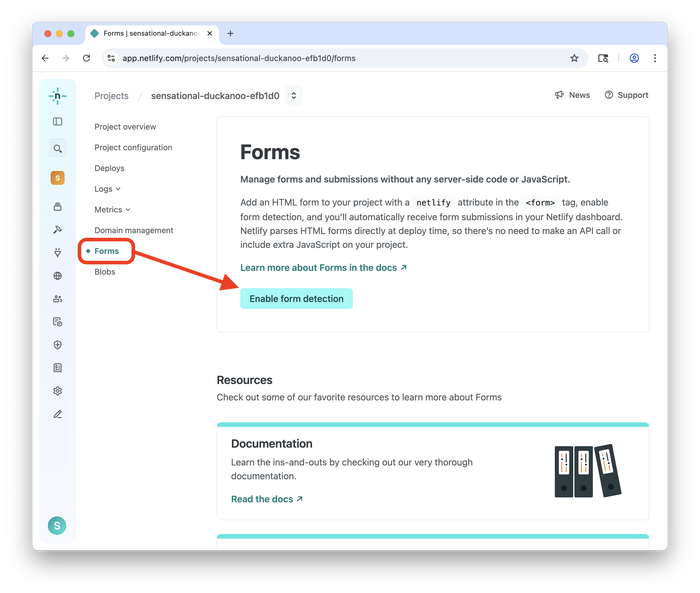
This last step is easy but still required. We can’t collect form submissions until we enable Netlify’s form feature for our website. Let’s do that now. Log in to Netlify, select your website, and then click the Forms link. Click the Enable form detection button, as shown below.
Now Netlify will collect form submissions from the contact page. Any form submissions you receive will be displayed on this web page.
Uploading the Website to Netlify
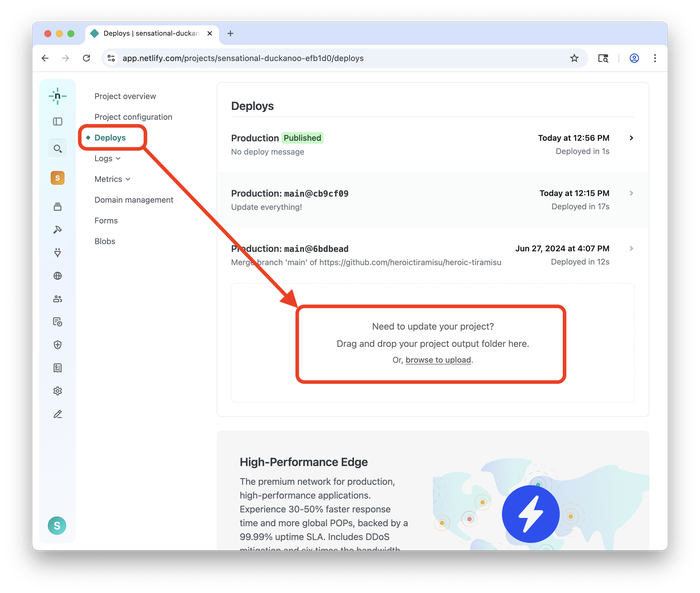
We’re finished working on our family website. To publish it, we’ll go back to Netlify and drag and drop the my-family folder onto Netlify’s website.
You can do this by logging in to Netlify, selecting your website, clicking the Deploys link, and then dragging your website folder onto the box in the middle of the page, as shown below.
After Netlify uploads your website, type the URL for your website in your web browser’s address bar to see the changes. Your family’s website has been published on the internet!
Troubleshooting Problems
If there’s one thing I know, it’s that you’ll run into problems while building your static website. Some issues will be easy to fix. Others will require more research. By learning how to troubleshoot problems, you’ll be better positioned to fix things when they break.
To get you started, I’ve compiled a list of common goofs and how to fix them. Feel free to refer back to this list as you work through this book.
Saving and Refreshing
If you look at a web page in your web browser and you don’t see the changes you just made in your text editor, it’s probably due to one of the following:
- You didn’t save the file in your text editor. If you don’t save the changes to the HTML file, the web browser won’t pick them up.
- You didn’t refresh the web page in your web browser. Always reload the page in your web browser to see the newest version of the web page.
If all else fails, try quitting your web browser and reopening it, then opening the web page again.
Checking Tags and Paths
When some of the content isn’t appearing on a web page, it’s probably one of the following:
- Tags are misspelled or not closed. Double check that you spelled all of the HTML tags correctly and that you closed all tags.
- Tags are nested incorrectly. If you open HTML tags inside of others, make sure you’ve closed them in the right order. You should always close the last-opened tag first.
- Path to image is incorrect. If an image isn’t appearing, check that the file exists and that you’ve used the correct directory path.
If you still can’t figure out the problem, try temporarily deleting content from your HTML file to narrow down the problematic code. Once you’ve identified the code that’s not working, go over it again and again until you find the issue.
Validating HTML
One of the best troubleshooting tools is an HTML validator. You give it your code—either by entering a URL to the web page or copying and pasting your source code into the validator page—and it checks it for a variety of common problems that human eyes can have difficulty spotting.
Take a look at the example below. I copied and pasted the source code for the contact form, and the validator correctly identified a misspelled instance of value inside an HTML tag.
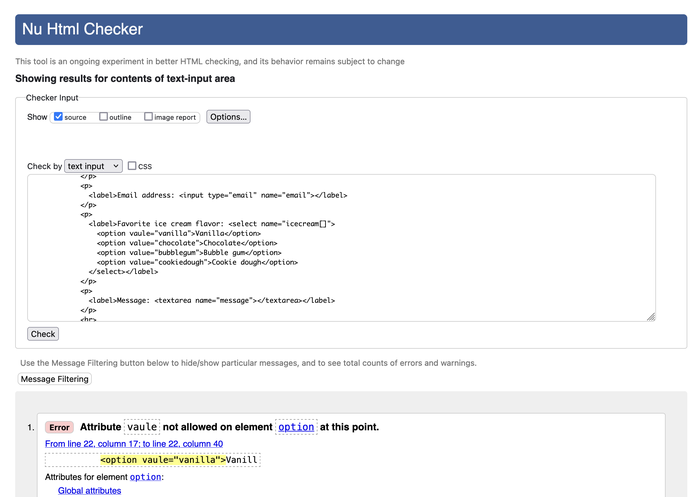
Validating your HTML is a good idea even when you don’t see any visible issues with your website. The validator can help you spot problems before they become a bigger issue.
Getting Help
If you discover a problem and don’t know how to fix it, I suggest conducting research. Don’t forget your trusty HTML reference! Keep it handy and use it frequently. As I mentioned earlier, two of my favorites are MDN Web Docs HTML Reference and htmlreference.io.
You could also visit forums like Stack Overflow and the Reddit r/webdev subreddit and search to see if anyone else has asked about the problem you’re experiencing. Maybe you’ll discover that your question has already been answered. Otherwise, you can post your question and try to get help from knowledgeable experts.
If all else fails, LLMs like ChatGPT and Claude can be great for troubleshooting. Just make sure to stay focused. Use them to fix your issue and then move on—don’t get sucked into chatting endlessly. These tools are designed to keep you talking, but your goal is to learn how to build static websites, not earn a PhD in prompt engineering.